vue使用websocket简单实例
本文将讲解vue使用websocket实现简单的前后端通信,提供具体的websocket实例代码供大家参考:
1、vue websocket 前端demo:
<!-- vue + websocket连接demo -->
<template>
    <div>
        <h1>vue + websocket连接demo</h1>
        <Button @click="test">test</Button>
    </div>
</template>


<script>
let socket;
// 给服务器发送一个字符串:
export default {
    data() {
        return {
            // 连接标志位
            lockReconnect: false,
            wsCfg: {
                // websocket地址
                url: "ws://127.0.0.1:8081"
            }
        };
    },
    methods: {
        createWebSocket() {
            try {
                // 创建Web Socket 连接
                socket = new WebSocket(this.wsCfg.url);
                // 初始化事件
                this.initEventHandle(socket);
            } catch (e) {
                // 出错时重新连接
                this.reconnect(this.wsCfg.url);
            }
        },
        initEventHandle(socket) {
            // 连接关闭时触发
            socket.onclose = () => {
                console.log("连接关闭");
            };
            // 通信发生错误时触发
            socket.onerror = () => {
                // 重新创建长连接
                this.reconnect();
            };
            // 连接建立时触发
            socket.onopen = () => {
                console.log("连接成功");
            };
            // 客户端接收服务端数据时触发
            socket.onmessage = msg => {
                // 业务逻辑处理
                console.log(msg.data, "ws:data");
            };
        },
        reconnect() {
            if (this.lockReconnect) {
                return;
            }
            this.lockReconnect = true;


            // 没连接上会一直重连,设置延迟避免请求过多
            setTimeout(() => {
                this.lockReconnect = false;
                this.createWebSocket(this.wsCfg.url);
            }, 2000);
        },
        test() {
            // 给服务器发送一个字符串:
            // ws.send("Hello!");
            socket.send("Hello!");
        }
    },
    mounted() {
        this.createWebSocket();
    }
};
</script>
2、node服务端启动websocket服务:
// 导入WebSocket模块:
const WebSocket = require('ws');

// 引用Server类:
const WebSocketServer = WebSocket.Server;

// 实例化:
const wss = new WebSocketServer({
    port: 8081
});

wss.on('connection', function (ws) {
    console.log(`[SERVER] connection()`);
    ws.on('message', function (message) {
        console.log(`[SERVER] Received: ${message}`);
        ws.send(`ECHO: ${message}`, (err) => {
            if (err) {
                console.log(`[SERVER] error: ${err}`);
            }
        });
    })
});
3、运行前后端代码:
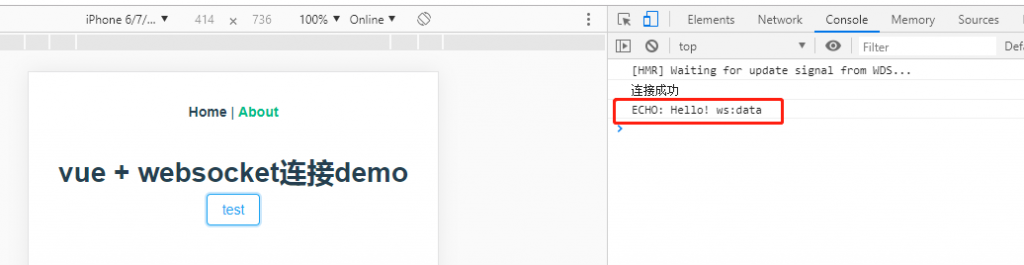
前端页面可以看到发送websocket数据后,接收到了后端的数据,实现了双向通信。
当然,我们还有更方便快捷的在vue中使用websocket的方法,那就是使用GoEasy提供的websocket服务。
目前GoEasy提供完整的websocket前后端解决方案,简单的几行代码集成,即可快速搭建您的专属websocket服务。 同时支持各种前端技术框架如小程序、uniapp、vue,支持各种服务端语言如php、java、python等。对websocket有需求的开发者可以来注册试用一下【立即注册】
原文地址: https://www.cnblogs.com/mengfangui/p/11320270.html