NodeJs 实现WebSocket服务,含前后端源码
这次给大家带来NodeJS怎么实现WebSocket功能,NodeJS实现WebSocket功能的注意事项有哪些,下面就是实战案例,一起来看一下。
服务器的实现很简单,先装一个nodeJs的模块,叫nodejs-websocket , 直接在nodeJs命令行中敲入:npm install nodejs-websocket回车就可以安装好了,
然后就可以开始建立服务器了,因为有了nodejs-websocket模块,所以很多工作都不用我们自己做,直接调用别人封装好的方法就行了:
- 服务端代码
- 根据客户端传来的消息判断哪个是game1,哪个是game2,保存connection对象。
var ws = require("nodejs-websocket");
console.log("开始建立连接...")

var game1 = null,game2 = null , game1Ready = false , game2Ready = false;
var server = ws.createServer(function(conn){
    conn.on("text", function (str) {
        console.log("收到的信息为:"+str)
        if(str==="game1"){
            game1 = conn;
            game1Ready = true;
            conn.sendText("success");
        }
        if(str==="game2"){
            game2 = conn;
            game2Ready = true;
        }

        if(game1Ready&&game2Ready){
            game2.sendText(str);
        }

        conn.sendText(str)
    })
    conn.on("close", function (code, reason) {
        console.log("关闭连接")
    });
    conn.on("error", function (code, reason) {
        console.log("异常关闭")
    });
}).listen(8001)
console.log("WebSocket建立完毕")
【game1代码】:通过点击获取三个框的内容,传到服务器
<!doctype html>
<html lang="en">
<head>
    <meta charset="UTF-8">
    <title>Document</title>
    <style>
        .kuang{text-align: center;margin-top:200px;}
        #mess{text-align: center}
        .value{width: 200px;height:200px;border:1px solid;text-align: center;line-height: 200px;display: inline-block;}
    </style>
</head>
<body>
    <div id="mess">正在连接...</div>
    <div class="kuang">
        <div class="value" id="value1">小明小明</div>
        <div class="value" id="value2">啦啦啦</div>
        <div class="value" id="value3">小张小张</div>
    </div>

    <script>
        var mess = document.getElementById("mess");
        if(window.WebSocket){
            var ws = new WebSocket('ws://127.0.0.1:8001');

            ws.onopen = function(e){
                console.log("连接服务器成功");
                ws.send("game1");
            }
            ws.onclose = function(e){
                console.log("服务器关闭");
            }
            ws.onerror = function(){
                console.log("连接出错");
            }

            ws.onmessage = function(e){
                mess.innerHTML = "连接成功"
                document.querySelector(".kuang").onclick = function(e){
                    var time = new Date();
                    ws.send(time + "  game1点击了“" + e.target.innerHTML+"”");
                }
            }
        }
    </script>
</body>
</html>
【game2代码】:获取服务推送来的消息,并且显示
<!doctype html>
<html lang="en">
<head>
    <meta charset="UTF-8">
    <title>Document</title>
    <style>
        .kuang{text-align: center;margin-top:200px;}
        #mess{text-align: center}
    </style>
</head>
<body>
    <div id="mess"></div>

    <script>
        var mess = document.getElementById("mess");
        if(window.WebSocket){
            var ws = new WebSocket('ws://127.0.0.1:8001');

            ws.onopen = function(e){
                console.log("连接服务器成功");
                ws.send("game2");
            }
            ws.onclose = function(e){
                console.log("服务器关闭");
            }
            ws.onerror = function(){
                console.log("连接出错");
            }

            ws.onmessage = function(e){
                var time = new Date().t.toLocaleDateString();
                mess.innerHTML+=time+"的消息:"+e.data+"<br>"
            }
        }
    </script>
</body>
</html>
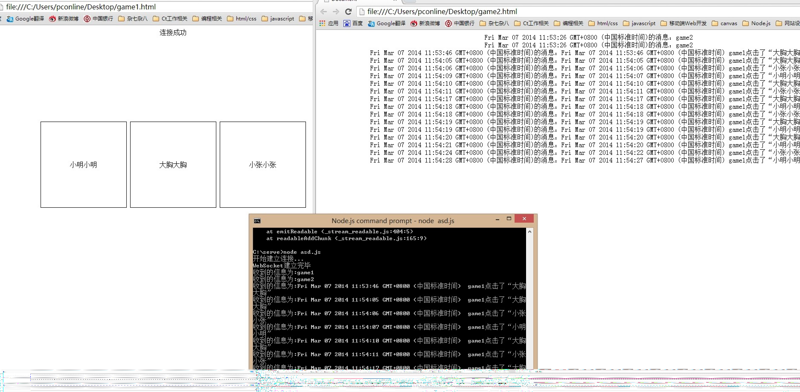
运行截图:

以上便是nodejs实现websocket服务的一般步骤。
要快速做好前后端的websocket服务开发部署本身不是一件简单的事情,要支持高并发、高稳定性就更难了。
好在GoEasy为大家提供了方便快捷的前后端集成websocket服务,能够让开发者在较短时间内就实现websocket服务的搭建。
同时GoEasy还支持更多的前端技术框架比如小程序、react、vue、uniapp等。同时还是支持php、java、python等服务端语言。 有websocket使用需求的开发者可以来注册GoEasy账号进行测试使用。【立即注册】